Custom MQTT/HTTP payloads
With VergeLink you can tailor the MQTT topics and message payloads to the needs of your cloud solution. You can either choose a preexisting "Protocol Template" or create your own.
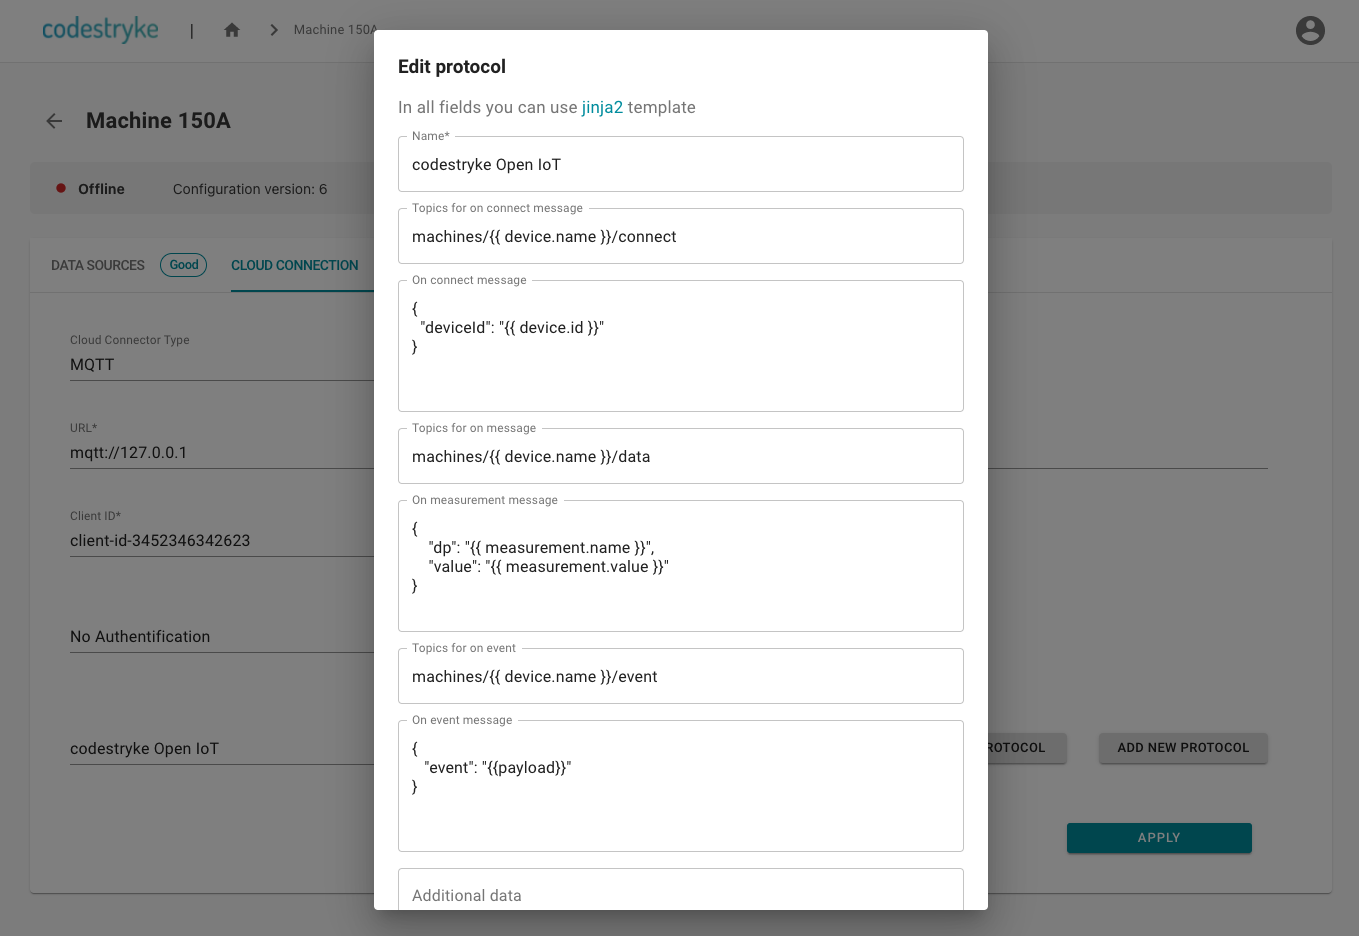
To create your own protocol navigate to the "Cloud Connection" Tab and click on the "EDIT PROTOCOL" button or create your own protocol using the "ADD NEW PROTOCOL" button. In both cases the "Edit Protocol" dialog will open:
Protocol Concepts
Each of the input fields supports the jinja2 templating language, VergeLink passes a number of variables to the templating engine that you can use in your MQTT message. For each protocol you can dynamically set the MQTT topic and message payload for three different types of MQTT messages:
- "On Connect"-Message: This message get send every time the VergeLink Runtime connects to the MQTT broker
- "On last will"-Message: This message gets send as the last will message when the VergeLink Runtime disconnects from the MQTT broker
- "On Measurement"-Message: These messages get send every time a data point is read from a data source
In addition there is also a field called "Additional Data" - here you can input a generic object that will be passed to the templating engine along with the default values.
To send multiple measurements in one message, you can check the "Batch data from each read cycle" checkbox.
Create a Custom Protocol
The following data can be used in the template:
Single measurement ("Batch data from each read cycle" checkbox is not checked)
{
   id: string; // message id
   level: EventLevels; // Event source (Device|DataSource|DataPoint|CloudConnector)
   type: string; // message type
   broker: {
      client_id: string; // Client Id - defined in user interface
   },
   device: {
      name: string; // device name - defined in device config file
      type: string; // device type - automatically captured
   },
   timestamp: string; // ISO timestamp for the measurement value
   timestamp_de: string; // DE timestamp for the measured value
   measurement: {
      id: string; // Id of the measured value Id
      name: string; // Measured value name - defined in user interface
      address: string; // address of the measurement
      value: string; // measured value
      unit: string; // measured value unit - defined in user interface
   },
   data_source: {
      name: string, // data source name - defined in user interface
      protocol: string, // data source protocol - defined in user interface
   }
}
Multiple measurements ("Batch data from each read cycle" checkbox is checked)
{
  id: "",
  level: "batch_event",
  type: "datapoint-measurement",
  broker: {
    client_id: undefined,
  },
  device: {
    name: "My_Dev_Device",
    type: null,
  },
  timestamp: "2022-03-10T06:15:10.508Z",
  timestamp_de: "2022-03-10T08:15:10.508Z",
  measurements: [
    {
      measurement: {
        value: "1.105822205543518",
        id: "f6029f27-5d62-5d97-afe3-8fc6163a61b3",
        unit: "",
        name: "CurrentL1_first",
        address: "DB25,REAL30",
        readFrequency: 10000,
      },
      id: null,
      level: "computed_data_point",
      type: null,
      payload: null,
      data_source: {
        id: "872eaf23-1e91-4a88-b9a7-654be8b8313e",
        name: "PAC1",
        protocol: "MODBUSTCP",
        asset_id: null,
        fieldDeviceType: "PAC2200",
      },
      cdp: {
        id: "a68157dd-82cf-4739-a50b-6eb129f44157",
        name: "myAggregates",
        operation: "AGGREGATE",
        readFrequency: 10000,
      },
      broker: {
        client_id: "MyVergeLinkGateway",
      },
      device: {
        name: "MyVergeLinkGateway",
        type: "IOT2050",
      },
      timestamp: "2022-03-10T06:15:10.508Z",
      timestamp_de: "2023-06-10T08:15:10.508Z",
    },
  ],
}
Multiple events ("Batch data from each read cycle" checkbox is checked)
{
  "source": "EDGE_RULES",
  "broker": {
    "client_id": "myClient12346"
  },
  "device": {
    "name": "My Dev Device",
    "type": "LINUX",
    "deviceId": "tkktc8b7ngr5",
    "deviceUuid": "88f87123-da71-4cb3-9750-d16b28a77169",
    "runtimeVersion": "V1.25.1"
  },
  "tenant": "admin",
  "timestamp": "2023-01-08T13:25:02.321Z",
  "timestamp_de": "Mon Apr 01 2023 15:25:02 GMT+0200 (Central European Summer Time)",
  "measurements": null,
  "events": [
    {
      "source": "EDGE_RULES",
      "broker": {
        "client_id": "myClient12346"
      },
      "device": {
        "name": "My Dev Device",
        "type": "LINUX",
        "deviceId": "tkktc8b7ngr5",
        "deviceUuid": "88f87123-da71-4cb3-9750-d16b28a77169",
        "runtimeVersion": "V1.25.1"
      },
      "tenant": "admin",
      "timestamp": "2023-01-08T13:25:02.321Z",
      "timestamp_de": "Mon Apr 01 2023 15:25:02 GMT+0200 (Central European Summer Time)",
      "measurement": {
        "value": true,
        "id": "1103c4ee-5d20-4bc0-8e2b-65079edf8788",
        "unit": "toggle",
        "name": "Toogle",
        "readFrequency": 1000,
        "address": "ns=1;s=Toggle",
        "metadata": null
      },
      "data_source": {
        "id": "e91e87b0-6067-45bf-8b2b-5b0e953ba959",
        "name": "SimulationServer",
        "protocol": "OPCUA",
        "asset_id": null,
        "fieldDeviceType": null,
        "metadata": null
      },
      "cdp": {
        "id": "a68157dd-82cf-4739-a50b-6eb129f44157",
        "name": "myAggregates",
        "operation": "AGGREGATE",
        "readFrequency": 10000
      },
      "rule": {},
      "eventText": {
        "id": "f5627659-b2e6-49af-92b4-e21749476867",
        "dataPointId": "1103c4ee-5d20-4bc0-8e2b-65079edf8788",
        "bit": 0,
        "comingEvent": true,
        "goingEvent": true,
        "text": "Toogle was triggered!"
      },
      "edgeEvent": {
        "id": "f5627659-b2e6-49af-92b4-e21749476867",
        "ts": "2024-04-08T13:40:53.419Z",
        "comingEvent": true,
        "goingEvent": false
      }
    }
  ]
}
Examples
Use the device name to separate data between devices:
Here is an example template for the "On Message" topic:
machines/{{ device.name }}/data
After it passed through the template engine it would look like this:
machines/Machine_150A/data
(In this example the machine name would be "Machine 150A")
Custom JSON payload (Single measurement)
Here is an example template for the "On Message" payload:
{
"timestamp": "{{ timestamp }}",
"dataSource": "{{ datasource.name }}",
"dataPoint": "{{ measurement.name }}",
"value": "{{ measurement.value }}",
"unit": "{{ measurement.unit }}",
}
After it passed through the template engine it would look like this:
{
"timestamp": "2021-05-05T10:05:55.975Z",
"dataSource": "PLC001",
"dataPoint": "temperatureSensorB132",
"value": "123.5343",
"unit": "°C",
}
Custom JSON payload (Multiple measurements)
Here is an example template for the "On Message" payload:
[
{% for m in measurements %}
{
"dataSource": "{{m.data_source.name}}",
"dataPoint": "{{m.measurement.name}}",
"value": "{{m.measurement.value}}",
"readFrequency": "{{m.measurement.readFrequency}}"
},
{% endfor %}
]
After it passed through the template engine it would look like this:
[
{
"dataSource":"PAC1",
"dataPoint":"CurrentL1",
"value":"1.1607321500778198",
"readFrequency":"10000"
},
{
"dataSource":"PAC1",
"dataPoint":"CurrentL2",
"value":"3.5373378416061401",
"readFrequency":"10000"
},
]
Custom JSON payload (Multiple events)
Here is an example template for the "On Event" payload:
[
  {% for e in events %}
  {
      "timestamp": "{{e.timestamp}}",
      "dataPoint": "{{e.measurement.name}}",
      "text": "{{e.eventText.text}}",
      "comingEvent": "{{e.edgeEvent.comingEvent}}",
      "goingEvent": "{{e.edgeEvent.goingEvent}}"
  } {% if loop.length  !== loop.index%},{% endif %}
  {% endfor %}
]
Custom Metadata Field
We have added the option to include metadata in data sources and data points. These will be accessible in the Protocol Template.
Adding Metadata
For the moment, metadata can only be added through the 'import device' option (This might change in the future). Here's how you can do it:
1. Export Your Device Configuration:
Begin by exporting your device configuration.
2. Modify Your Device Config:
Add metadata in the format {"name": "value"} to your data source or data points in the exported configuration file.
Example:
// Device Config file
{
  "rules": [],
  // ...
  "data_sources": [
    {
      "id": "ce2aec4e-0e1f-4374-8c49-223161903d04",
      // ...
      "metadata": {
        "custom_identifier": "Dev Machine"
      },
      "data_points": [
        {
          "id": "5d178381-c0bd-4d13-a759-7cac0ef50d14",
          "address": "ns=1;s=Temperature",
          // ...
          "metadata": {
            "custom_identifier": "Dev Machine DP 1"
          }
        }
      ]
    }
  ]
  //...
}
3. Import the Device Configuration
Once you've added the metadata, import the device configuration back into the system.
4. Access Fields in the Protocol Template
The metadata is accessible in the following manner. In this example, we demonstrate how to put the metadata at the top level:
[
  {% for m in measurements %}
  {
    "ts": "{{ m.timestamp }}",
    "device": "{{ device.name }}",
    "dataSource": "{{ m.data_source.name }}",
    "dataPoint": "{{ m.measurement.name }}",
    "value": "{{ m.measurement.value }}",
    "dp_metadata": "{{ m.measurement.metadata.custom_identifier }}",
    "ds_metadata": "{{ m.data_source.metadata.custom_identifier }}"
  }{% if not loop.last %},{% endif %}
  {% endfor %}
]